Tuesday, 31 May 2016

Something Special Part 2


Several processes to finish this project including decoration, personalisation, assembling and binding. With the size of this project it was fairly faster to complete. These are the last processes in completed, I will save the big reveal for another post.

The inside pockets were designed to fit two writing implements, business cards as well as paper, receipts, sticker sheets and paper clips. The design is very simple with the writing implements and business cards to be stored on the right and the rest on the left. As my client (Shhh... she doesn't know yet) has her own business and needs to have everything on hand I have allowed this to be a kind of business wallet for her designs and her contacts details. I included a small decorative stitch on the top left pocket for some added flare. It is of similar colour to the fabric but I believe if it stood out in a different colour it would look a bit tacky. Hence the gradient quilting thread.

The next decoration was a small hexagon flower for the inside of the portfolio. So instead of 7cm hexagons that are on the front panel, I downsized to 1" hexagons. I'm currently also working on my first all english paper piecing quilt using 1" hexagons so I had a ton of these templates.
Sewing all the petals to the middle hexagon, I then sewed the sides together. After I carefully irons the flower with an iron before taking out the tacking thread and paper templates.
I appliquéd the the flower onto the top right hand corner. This was a slower process as I had to be careful to stitch outside the lines. The flower is so small there was a lot of turning, I put the machine on a slow setting and using the pressure foot to run the machine instead of the start/stop button. I sewed around the edges and in the seam ditch to secure it to the inside of the folio.


After putting the finishing touches on the inside, I followed on with the outside personalisation. So I will show this part in the reveal, (as my client may be reading this) but "Thor" (my new machine's name) can stitch letters! So I can now do a level of personalisation without hand stitching! For my quilts as well, this is a life saver as far as labelling goes. The process is all automatic using the start/stop button and all I had to do in this project was make sure that the name was straight. I was able to personalise the portfolio with the client's name with out any time wasted!

Once that was finished I then squared the lining of the portfolio to the front panel carefully so I could close the folio with ease. This included testing with a book and a few pens inside. Pinning with huge quilting pins, I trimmed the excess fabric of the front panel and zig-zag stitched the edges together. I do not normally do this with quilts as in most circumstances the quilting keeps the edges together. However in this case there wasn't anything keeping the lining and the front panel together. I didn't want any slipping so this was a necessary step.
Next came binding! Has anyone used these awesome binding making tools? This is one of my favourite things to use other than my scissors. This one creates 1" width binding which is what I always use and I wish I knew about these things years ago when I started quilting.
You simply cut a width of one and three quarter inch strips and sew the binding strips to get the length you need. I cut the end of the binding on a 45 decree angle and then pull the fabric through the binding tool. Using an iron you carefully iron the fabric as it goes through the opposite side. It creates the folds in the fabric to make ready to sew binding. It still takes some time but it beats folding the fabric in half and then   fold those halves into half again. Anyway so sewing the border was easy with the secure of the zig-zag stitch.


The hand stitching was pretty quick because of the size. I was watching Scrubs while I did this. One on my favourite parts of doing sewing is having the excuse to watch DVDs while still being productive.
So it's finished! I'm very happy with the result. I'll reveal the final accessorised product once the client has received it. It's exciting to complete something for someone.
Stay tuned for the reveal and my client's reaction. I can't wait!

Miss Mae.


Monday, 16 May 2016

Something Special

 So I started something special this weekend. I had a little hiccup with the border of no.13 so I decided to take a break from it and think about the what I'm going to do next.
So I decided to make a A5 portfolio. I haven't made one of these in at least four to five years. I found the idea for this kind of project in school and again as a school project I made three customised portfolios for my two sisters and myself.
The purpose of these portfolios is like a handbag for stationary. Its primary objective is to carry a notebook or notepad as well as pens, pencils, sticky notes and any other essential items for the person's hobby or study.
This portfolio will accomodate for an A5 note book and will have an English Paper Piecing cover using hexagons. The hexagons are about 3 inches. I can not recall exactly the size, I will put it at the bottom of their post or in the comments. There are six colours on the cover not including the border colour.
To the right is how I formed the hexagons, I secure the paper template with a pin and then tack the seams under with thread. I then roughly slipped stitched the hexagons together with the same colours connected in a diagonal pattern. I sewed them roughly because I intended to quilt the cover in the ditch.
While I sewing I was watching "Masterchef Australia 2016" encore and then watched one of my favourite Australian films, "The Dish". It's a special film for me as I studied it in school and was fortunate to visit Parks and the Dish in the same year. This process took a good few hours even with just the rough sewing. Below is a one of the complete flowers. I make flowers first and then sew any extra hexagons around the flowers to make it in a large rectangle shape to cover the area of the portfolio lining.

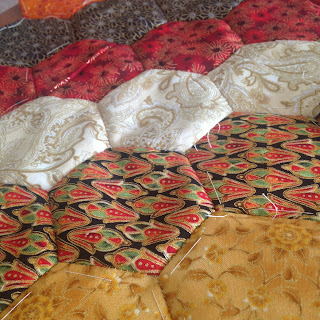
This picture shows the colours that I used. It reminds me of a Japanese robe with all the rich reds, greens, black and the gold foiling accents through the patterns. I also love the way hexagons look in quilting, they look like little cushions which makes me feel cozy. So this image is before quilting and almost finished.

The next image is a close up of my stitching which is a little easier to see because of the cream thread. Yes not an ideal colour but the closest I have currently. I switched from cream to a sort of dark red almost black thread depending on the fabrics. Ultimately the thread would be invisible as it will be stitched over in the quilting stage.
Completing the hand sewing, I carefully remove the paper from the back and with the hexagons that are on the edges I make sure the edges are ironed flat to keep the crease sharp. Eventually these edges will be trim in the assembling of the portfolio but I still like to keep the shape of the hexagons for quilting purposes. I then ironed a light interfacing on the back to hold the shape of the panel.
Using my new Machine, which is now been named "Thor" (Friend's suggestion), I started quilting in the ditch - between the two fabrics. I used pins to secure the layers which include the panel fabric, light interfacing and cotton wadding. The lining is not quilting as the insert of pockets, etc would then effect the front of the folio, the lining will be attached at the binding stage.
This process took about an hour. I was listening to CNBlue mix which I have made for myself. Helps that I don't have to change my CD every 30 minutes. Quilting with Thor is so simple and I realised half way through that I could do some decorative stitches on the inside.
So this is the back of the quilting. Incredibly neat and the machine brings all the thread to the back and cuts it. This makes it so easy to check for threads.
So that's where I am at for this project. I love doing this kind of smaller project because its a little quicker and measurements are a easier to cater for. Happy with the result.
Stay tuned for final result and let me know what you think.
Miss Mae.

Saturday, 7 May 2016

Late start...

I have learned... I need start earlier in the day. I could get so much done if I did that. 
Keeping with being prepared for anything, I made sure my face was somewhat presentable. My glasses are an old pair that I need for reading when I was in primary school. They are slightly tinted in violet and have almost no magnification. I use these as safety in case anything breaks and flies in the air. So its not a fashion statement but I do like to wear them for safety reasons.
Continuing with quilt 13, the pattern is one I found on Pinterest from Neil Burley (See above). I loved the 3D effect of the pattern and also the colours. So my colour choices are pretty similar. In order to test my new machine, (Pfaff Quilt Expression 4.2) I wanted to do something simple but still have an amazing visual effect. 

My machine is currently on a straight stitch. The great thing about this machine is that it ties at the beginning and end of the seam and cuts the thread. I won't waste any more thread, and you have no idea how happy I am about that. 


I use the side of the foot as a guide to make the patchwork seams. This is a process that I usually use to keep the seams the same.
I am so impressed with how easy it is to use this machine and how the seams match so well. Of course there were still a few hiccups. At one point I sewed the white squares on the right side instead of the bottom of the patch, which would have made it very difficult to sew the rest of the squares. I got a little confused because on the right column at the top there is two white squares and two green squares and my brain just assumed it was the same, especially when I have to sew something that's similar. A terrible flaw of mine, but nothing a good quick unpick/seam ripper can't fix.
Pinning the seams together was simple as each patch is a square, and a large square at that. The squares when sewn are roughly 7 inch squared which makes matching seams easy with no adjusting needed. I must say part of this is due to the machine. I think I might be falling in love...

The music I was listening to today were "Life in Cartoon Motion" by Mika and "One of the Boys" by Katy Perry as well as a mix of Big Bang songs. Yes, I am a massive K-Pop fan. Music is a motivator for me. I love music and have lived with music my whole life. So soundtracks as well as TV shows and movies will always make an appearance with my quilts. Nothing like quilting to some hard rock and pop music in the background.

What I have so far is just over half of the main panel. I have yet to decide what to do for the borders as I have only bought fabric for the patchwork and the green pattern was left over from an apron. If you are interested in the aprons I have made let me know in the comments.
Hoping I will be more motivated to finish the panel early tomorrow.

Until tomorrow... maybe...
Miss Mae.


Wednesday, 4 May 2016

Visit to Melbourne and the beginning of no.13


In Melbourne today for professional development. It's so nice to see the ocean again. I recently moved to the country in Victoria Australia for a teaching position, so coming to my city is now a luxury. This morning the ocean was so blue I was very reluctant to leave it. 

After a great day I went hunting for some coffee for my long two hour drive home and saw this awesome red brick building by the beach. This is a little gem on the Port Phillip Bay Coast called Dollies. Such a cute place with great coffee. If you cannot tell this is the beginning of my coffee obsession. My order is a cappuccino with full cream milk and occasionally I will have sugar. I love, love, love coffee! I feel especially lucky to live in Victoria, Australia where good coffee is an art form.

Coffee addiction aside, I have started making my thirteenth quilt. I began on the 1st of May with the cutting the patchwork element. I'm making something a little simpler this time. I want to test out my new Pfaff Quilt Expression 4.2 to see what I can do with it. I also need to get used to its features, especially to the buttons as opposed to dials and levers. So far assembling the squares has been very quick. I feel that it has already cut my time in half. Even though it's such a simple pattern, there are several squares to make. From here I made the centre of the quilt and I'm going to work my way out. I am excited to see how it turns out. 

Miss Mae


Monday, 2 May 2016

"Talitha" (no.12)

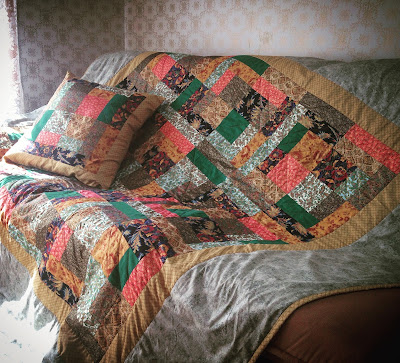
So my most recent quilt (no.12) was a commission from my sister. This is the second time I have made this pattern and it is one of my favourites. Reason being that it is hard to make a mistake. The pattern makes matching seams so easy. It is also a wonderful way to be creative with fabrics, colours and patterns. I find it is a really great pattern for beginners.  


This quilt is 70" by 70" and covers the top of a double bed. It also has the company of a 20" square pillow. The fabrics chosen are very colourful with a common gold detailing through the patterns.   


This is one quarter of the large patchwork square. Each quarter is about 8" squared.


This is the most exciting and best hack I have found when assembling a quilt. I lay out the backing on the floor and then using a pool noodle rolled the wadding onto the backing and then rolled the quilt top onto the wadding. This works so well to prevent bulking between the layers. 


I used my Pfaff Hobby 380 to quilt this one because I had not yet purchased the Pfaff Quilt Expression 4.2. This was the hardest thing about quilting on the physical side. My little dressmaking machine has very little room to pull the quilt through which affected my neck and back muscles. Making this quilt made me realise how much I needed to invest in a larger machine designed for quilting. 


For the border and binding I decided to have a double border to expand the size of the quilt. I chose a gold checked pattern with metallic gold detailing like the fabrics in the patchwork. For the larger border and the backing I chose blue tone grey to lessen the impact of the metallic accents. Hand sewing is one of my favourite parts of making a quilt. I usually watch TV when I do this or re-watch some of my favourite shows like How I Met Your Mother, Scrubs, Gilmore Girls and The Community. If you have any recommendations let me know.

This being my twelfth quilt, it was called "no.12" for a while. I decided to name it after my sister, "Talitha." 
After sewing the border I literally started on "no.13" which I am so excited about because it'll be the first quilt I will make with my new machine. 

If you are interested in any of my other past quilts let me know in the comments. Thank you for reading.
Miss Mae


Sunday, 1 May 2016

Mentally Prepared

Anyone who has ever opened the front door wearing track pants and a misshaped t-shirt covered in thread and fluff will understand the value of this advice. For the most part I will often find my socks cased in thread after a day of sewing. Even though I have to pick every last one off before putting them in the washing machine, I don't really mind. 
This is my hobby. I began at 15 years of age, taking lessons from my aunty in the skills of quilting for a school Textiles project. Since then, I have made twelve quilts in addition to several aprons, oven mitts, towels, pillows, portfolios, clothing and accessories. Quilting is a joy for me and I have always wanted to journal my progress. 
So this is my first day at twelve finished quilts. I have the company of my two Pfaff Sewing Machines, my Hobby 380 (my first sewing machine) and my new Quilt Expression 4.2. I hope to learn and to teach and inspire others to sew and create new things. 
So… I’m mentally preparing and putting myself out there. 


PS: There is likely to be more than just quilts... coffee being one of them...

Miss Mae