Showing posts with label personalisation. Show all posts

Sunday, 5 June 2016

Something Special The Reveal (part 3)


The reveal... yes I have given my client her gift and she literally teared up! Then she proceeded to thank me several times and to be honest that is why I sew. I really enjoy seeing reactions of joy on my clients' face. It just makes my day.

So on with the reveal.
The portfolio has one clasp closure which keeps it all together. The folio allows for one book of A5 size as well as pens, pencils, paperclips, notepads, sticker sheets, business cards and other important documents.
The cover in is quilted with hexagons of 7cm wide in diagonal rows. It is bound with a bias strip to keep all raw edges closed.

The inside was accessorised for the client including a pen, pencil, notepad, bookmark, bull clip, paper clips and an A5 book. They were selected to compliment the fabrics and gold accents.
The cover was personalised with the client's name so it's extra special. The exciting thing about having Thor is that I can make these personal touches. And yes I have been going on and on about how wonderful my new machine is but it's only because I haven't been able to do anything it offers. Button holes and zips were a nightmare before and now I can make them with ease.
Anyway enough about that. My client was so happy to receive this. As she is a follower of me on Instagram, she had been following some of the progress. She was so curious as to what the final product was but she had no idea that it was for her. It was truly wonderful to see her face light up when she opened it.
The reason for making this project for her was to accommodate for her business. She is an artist in Plush design as well as watercolour painting and cosplay. She takes commissions and is extremely talented. She will be moving to Japan in two months and has created an Etsy shop to sell her small plush patterns. Link to her shop will be below, you most definitely should check it out.
She will be using this portfolio for her planning and business. I'm so excited for her to use it and to get the best out of it.
Thanks to her for the inspiration, it is one of my favourite pieces I've made and even more now that it will be used and loved.
Links to her shop are below as well as the link to my Instagram. Feel free to visit.

Comment below on your thoughts. I'm so happy to receive any feedback.

Miss Mae.


Chinta Etsy Shop
https://www.etsy.com/au/shop/ScarletSongstress?ref=search_shop_redirect


My Instagram
https://www.instagram.com/miss.mae90/


Tuesday, 31 May 2016

Something Special Part 2


Several processes to finish this project including decoration, personalisation, assembling and binding. With the size of this project it was fairly faster to complete. These are the last processes in completed, I will save the big reveal for another post.

The inside pockets were designed to fit two writing implements, business cards as well as paper, receipts, sticker sheets and paper clips. The design is very simple with the writing implements and business cards to be stored on the right and the rest on the left. As my client (Shhh... she doesn't know yet) has her own business and needs to have everything on hand I have allowed this to be a kind of business wallet for her designs and her contacts details. I included a small decorative stitch on the top left pocket for some added flare. It is of similar colour to the fabric but I believe if it stood out in a different colour it would look a bit tacky. Hence the gradient quilting thread.

The next decoration was a small hexagon flower for the inside of the portfolio. So instead of 7cm hexagons that are on the front panel, I downsized to 1" hexagons. I'm currently also working on my first all english paper piecing quilt using 1" hexagons so I had a ton of these templates.
Sewing all the petals to the middle hexagon, I then sewed the sides together. After I carefully irons the flower with an iron before taking out the tacking thread and paper templates.
I appliquéd the the flower onto the top right hand corner. This was a slower process as I had to be careful to stitch outside the lines. The flower is so small there was a lot of turning, I put the machine on a slow setting and using the pressure foot to run the machine instead of the start/stop button. I sewed around the edges and in the seam ditch to secure it to the inside of the folio.


After putting the finishing touches on the inside, I followed on with the outside personalisation. So I will show this part in the reveal, (as my client may be reading this) but "Thor" (my new machine's name) can stitch letters! So I can now do a level of personalisation without hand stitching! For my quilts as well, this is a life saver as far as labelling goes. The process is all automatic using the start/stop button and all I had to do in this project was make sure that the name was straight. I was able to personalise the portfolio with the client's name with out any time wasted!

Once that was finished I then squared the lining of the portfolio to the front panel carefully so I could close the folio with ease. This included testing with a book and a few pens inside. Pinning with huge quilting pins, I trimmed the excess fabric of the front panel and zig-zag stitched the edges together. I do not normally do this with quilts as in most circumstances the quilting keeps the edges together. However in this case there wasn't anything keeping the lining and the front panel together. I didn't want any slipping so this was a necessary step.
Next came binding! Has anyone used these awesome binding making tools? This is one of my favourite things to use other than my scissors. This one creates 1" width binding which is what I always use and I wish I knew about these things years ago when I started quilting.
You simply cut a width of one and three quarter inch strips and sew the binding strips to get the length you need. I cut the end of the binding on a 45 decree angle and then pull the fabric through the binding tool. Using an iron you carefully iron the fabric as it goes through the opposite side. It creates the folds in the fabric to make ready to sew binding. It still takes some time but it beats folding the fabric in half and then   fold those halves into half again. Anyway so sewing the border was easy with the secure of the zig-zag stitch.


The hand stitching was pretty quick because of the size. I was watching Scrubs while I did this. One on my favourite parts of doing sewing is having the excuse to watch DVDs while still being productive.
So it's finished! I'm very happy with the result. I'll reveal the final accessorised product once the client has received it. It's exciting to complete something for someone.
Stay tuned for the reveal and my client's reaction. I can't wait!

Miss Mae.


Monday, 16 May 2016

Something Special

 So I started something special this weekend. I had a little hiccup with the border of no.13 so I decided to take a break from it and think about the what I'm going to do next.
So I decided to make a A5 portfolio. I haven't made one of these in at least four to five years. I found the idea for this kind of project in school and again as a school project I made three customised portfolios for my two sisters and myself.
The purpose of these portfolios is like a handbag for stationary. Its primary objective is to carry a notebook or notepad as well as pens, pencils, sticky notes and any other essential items for the person's hobby or study.
This portfolio will accomodate for an A5 note book and will have an English Paper Piecing cover using hexagons. The hexagons are about 3 inches. I can not recall exactly the size, I will put it at the bottom of their post or in the comments. There are six colours on the cover not including the border colour.
To the right is how I formed the hexagons, I secure the paper template with a pin and then tack the seams under with thread. I then roughly slipped stitched the hexagons together with the same colours connected in a diagonal pattern. I sewed them roughly because I intended to quilt the cover in the ditch.
While I sewing I was watching "Masterchef Australia 2016" encore and then watched one of my favourite Australian films, "The Dish". It's a special film for me as I studied it in school and was fortunate to visit Parks and the Dish in the same year. This process took a good few hours even with just the rough sewing. Below is a one of the complete flowers. I make flowers first and then sew any extra hexagons around the flowers to make it in a large rectangle shape to cover the area of the portfolio lining.

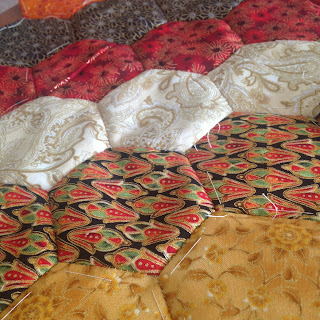
This picture shows the colours that I used. It reminds me of a Japanese robe with all the rich reds, greens, black and the gold foiling accents through the patterns. I also love the way hexagons look in quilting, they look like little cushions which makes me feel cozy. So this image is before quilting and almost finished.

The next image is a close up of my stitching which is a little easier to see because of the cream thread. Yes not an ideal colour but the closest I have currently. I switched from cream to a sort of dark red almost black thread depending on the fabrics. Ultimately the thread would be invisible as it will be stitched over in the quilting stage.
Completing the hand sewing, I carefully remove the paper from the back and with the hexagons that are on the edges I make sure the edges are ironed flat to keep the crease sharp. Eventually these edges will be trim in the assembling of the portfolio but I still like to keep the shape of the hexagons for quilting purposes. I then ironed a light interfacing on the back to hold the shape of the panel.
Using my new Machine, which is now been named "Thor" (Friend's suggestion), I started quilting in the ditch - between the two fabrics. I used pins to secure the layers which include the panel fabric, light interfacing and cotton wadding. The lining is not quilting as the insert of pockets, etc would then effect the front of the folio, the lining will be attached at the binding stage.
This process took about an hour. I was listening to CNBlue mix which I have made for myself. Helps that I don't have to change my CD every 30 minutes. Quilting with Thor is so simple and I realised half way through that I could do some decorative stitches on the inside.
So this is the back of the quilting. Incredibly neat and the machine brings all the thread to the back and cuts it. This makes it so easy to check for threads.
So that's where I am at for this project. I love doing this kind of smaller project because its a little quicker and measurements are a easier to cater for. Happy with the result.
Stay tuned for final result and let me know what you think.
Miss Mae.