 So I started something special this weekend. I had a little hiccup with the border of no.13 so I decided to take a break from it and think about the what I'm going to do next.
So I decided to make a A5 portfolio. I haven't made one of these in at least four to five years. I found the idea for this kind of project in school and again as a school project I made three customised portfolios for my two sisters and myself.
The purpose of these portfolios is like a handbag for stationary. Its primary objective is to carry a notebook or notepad as well as pens, pencils, sticky notes and any other essential items for the person's hobby or study.
This portfolio will accomodate for an A5 note book and will have an English Paper Piecing cover using hexagons. The hexagons are about 3 inches. I can not recall exactly the size, I will put it at the bottom of their post or in the comments. There are six colours on the cover not including the border colour.
To the right is how I formed the hexagons, I secure the paper template with a pin and then tack the seams under with thread. I then roughly slipped stitched the hexagons together with the same colours connected in a diagonal pattern. I sewed them roughly because I intended to quilt the cover in the ditch.
While I sewing I was watching "Masterchef Australia 2016" encore and then watched one of my favourite Australian films, "The Dish". It's a special film for me as I studied it in school and was fortunate to visit Parks and the Dish in the same year. This process took a good few hours even with just the rough sewing. Below is a one of the complete flowers. I make flowers first and then sew any extra hexagons around the flowers to make it in a large rectangle shape to cover the area of the portfolio lining.
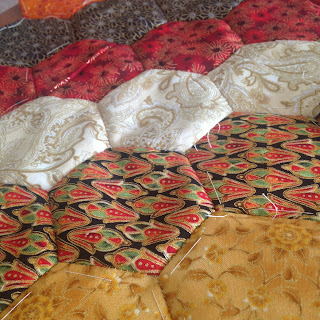
This picture shows the colours that I used. It reminds me of a Japanese robe with all the rich reds, greens, black and the gold foiling accents through the patterns. I also love the way hexagons look in quilting, they look like little cushions which makes me feel cozy. So this image is before quilting and almost finished.
The next image is a close up of my stitching which is a little easier to see because of the cream thread. Yes not an ideal colour but the closest I have currently. I switched from cream to a sort of dark red almost black thread depending on the fabrics. Ultimately the thread would be invisible as it will be stitched over in the quilting stage.
Completing the hand sewing, I carefully remove the paper from the back and with the hexagons that are on the edges I make sure the edges are ironed flat to keep the crease sharp. Eventually these edges will be trim in the assembling of the portfolio but I still like to keep the shape of the hexagons for quilting purposes. I then ironed a light interfacing on the back to hold the shape of the panel.
Using my new Machine, which is now been named "Thor" (Friend's suggestion), I started quilting in the ditch - between the two fabrics. I used pins to secure the layers which include the panel fabric, light interfacing and cotton wadding. The lining is not quilting as the insert of pockets, etc would then effect the front of the folio, the lining will be attached at the binding stage.
This process took about an hour. I was listening to CNBlue mix which I have made for myself. Helps that I don't have to change my CD every 30 minutes. Quilting with Thor is so simple and I realised half way through that I could do some decorative stitches on the inside.
So this is the back of the quilting. Incredibly neat and the machine brings all the thread to the back and cuts it. This makes it so easy to check for threads.
So that's where I am at for this project. I love doing this kind of smaller project because its a little quicker and measurements are a easier to cater for. Happy with the result.
Stay tuned for final result and let me know what you think.
Miss Mae.


Hi Miss Mae, love your colour choices. I'm glad you're finding Thor such a benefit with your quilting
ReplyDeleteThank you! It is such a good machine.
Delete